
The blog...
The Blog
So as you may have noticed by now I’ve gone live with my blog and decided which technology to use. I decided to use a Dynamic editor to allow for instant styling and feature sets, but then to use a static publishing plugin to crate a fast, static and globally delivered website via CloudFront.
N.B. Technical content is accurate but the blog it references is no longer used
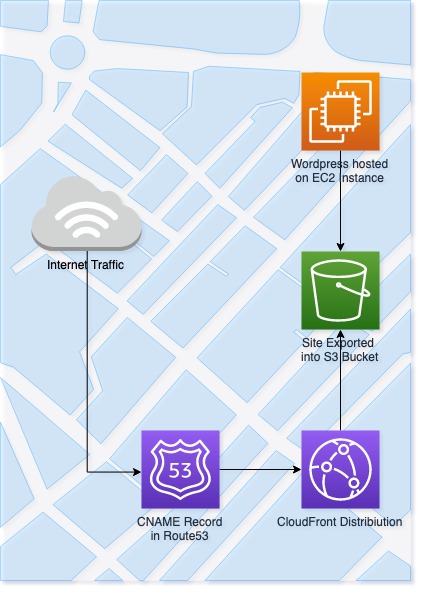
As you can see from the diagram there is still an EC2 instance involved. This EC2 instance is only required during editing. The trick here is maybe keep a shell script on your machine to start the instance prior to your editing the site. AWS also has an instance scheduler available to ensure that your EC2 instance doesn’t stay online too long.
“Amazon Web Services (AWS) offers infrastructure on demand so that customers can control their resource capacity and pay only for what they consume. One simple method to reduce costs is to stop resources that are not in use, and then start those resources again when their capacity is needed” – https://aws.amazon.com/solutions/instance-scheduler/
Even if you set your instance to be on during your office hours or even your spare time (e.g. after work), the savings to be gained are massive $$$ (66% to 75% on a weekday).
On the EC2 Instance is a WordPress install, hosted on Apache 2.4 and PHP7.2. The database is still stored on an RDS instance, making the data of the wordpress install safe and non-reliant on the EC2. This is only a blog, but data integrity is still something i like to maintain. A plugin is then installed onto the WordPress install to enable static content generation.
“Close WordPress vulnerabilities. Handle massive pageloads quickly. Be in control of your WordPress hosting.” – https://wp2static.com/
WP2Static, developed by Leon Stafford, has many features but the main features I utilise it for include static export to allow faster delivery of the site and removal of WordPress headers to improve security. Over the years it’s improved with community input but Leon remains dedicated to the cause of security and performance of WordPress sites and evangelises WordPress around the world at public meets.
The configuration of WP2Static is really easy. Pick your delivery method (Folder, FTP, S3, etc) and then add your credentials. The rest of the configuration is optional and circumstantial. There’s also a little heart icon where you can donate to the progress of the plugin.
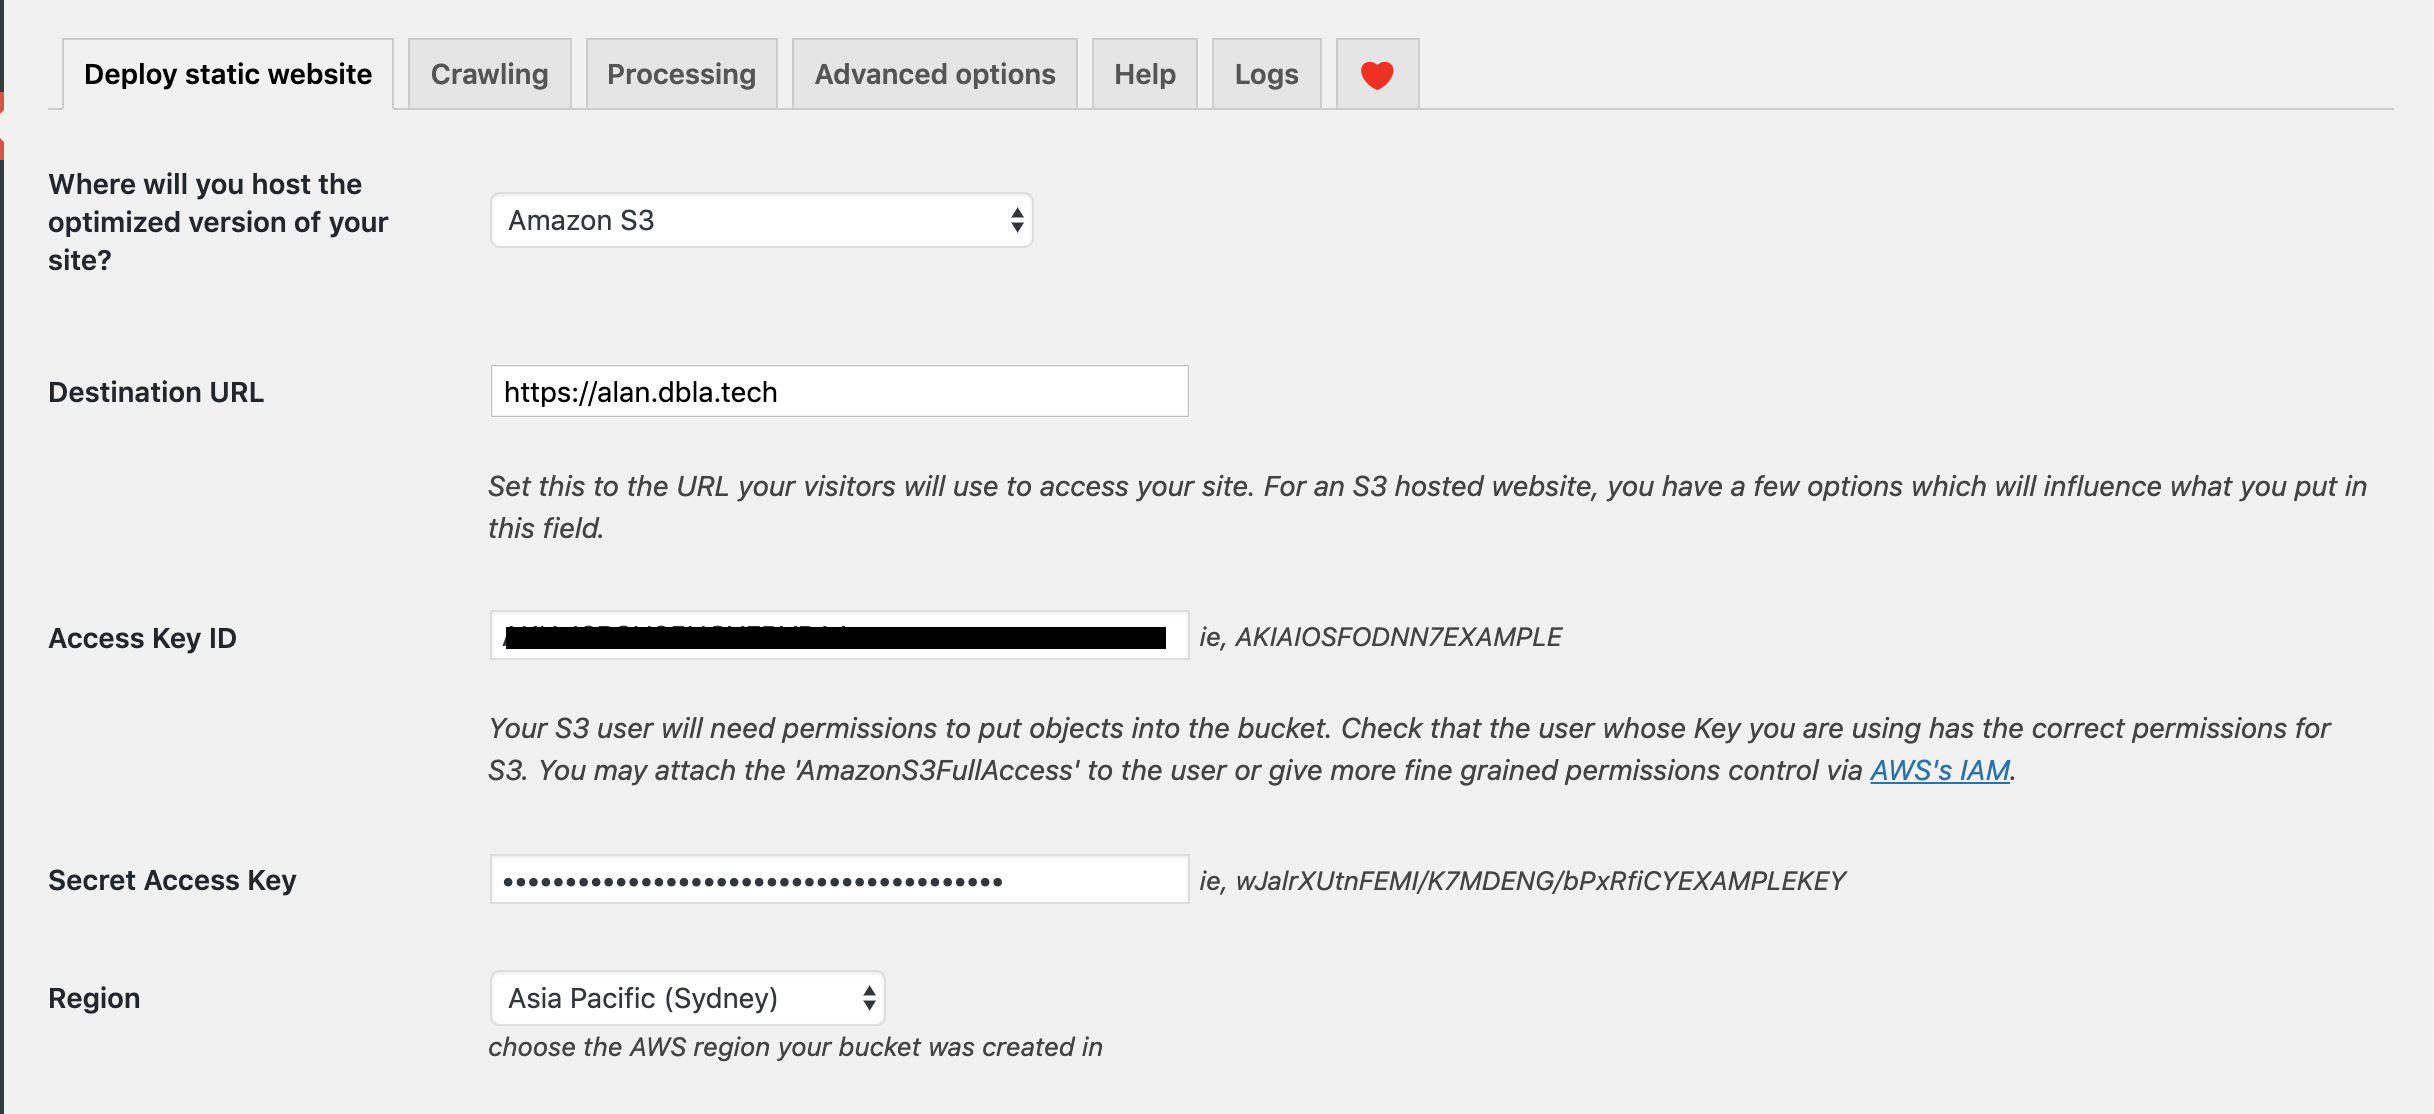
As part of the configuration of the plugin you also provide a CloudFront distribution ID. This also allows invalidation of the CloudFront cache which then makes sure your CloudFront cache is providing fresh content at all times.
After this point, the rest is down to AWS features (S3 , CloudFront & Route53) and some simple configuration.
At this point, I’m better-off telling you what the S3 bucket is NOT, rather than IS. The S3 configuration, despite popular belief is not a public bucket. It’s a private bucket used just for storage. It doesn’t even need to be named the same as your DNS entry. Just a simple bucket. You can enable Static Website Hosting which will then give access to the content via a URL without needing public S3 bucket access.
CloudFront is where the magic happens.
“Amazon CloudFront is a fast content delivery network (CDN) service that securely delivers data, videos, applications, and APIs to customers globally with low latency, high transfer speeds, all within a developer-friendly environment. CloudFront is integrated with AWS – both physical locations that are directly connected to the AWS global infrastructure, as well as other AWS services. CloudFront works seamlessly with services including AWS Shield for DDoS mitigation, Amazon S3, Elastic Load Balancing or Amazon EC2 as origins for your applications, and Lambda@Edge to run custom code closer to customers’ users and to customize the user experience. Lastly, if you use AWS origins such as Amazon S3, Amazon EC2 or Elastic Load Balancing, you don’t pay for any data transferred between these services and CloudFront.” – https://aws.amazon.com/cloudfront/
At this point, it’s pretty much your own choice how to configure your CloudFront. Under General I chose to use All edge locations, apply my personal site SSL certificate (from ACM) and enable Access Log storage in S3.
The Origin I’ve configured is NOT an S3 bucket, but is the origin domain name from the previously configured S3 bucket. By using an origin domain, this is then recursive and accepts generic index file, which can be specified.
As for the behaviour, i simply enabled HTTPS with HTTP redirecting to HTTPS. This way my site is covered by SSL making it compliant with newer “policies”, enforced by modern browsers. The rest is up to you.
To place the cherry on top we use Route53 to create a CNAME for our sites domain/hostname to point to the CloudFront distribution.