Creating an S3 bucket
Creating an AWS S3 bucket and how it's changed over the years
Hi, My name’s Alan and I’m a self proclaimed AWS evangelist and today I’m going to talk about Amazon S3. For a newbie in the AWS world, this could be daunting. So let’s start from the start. How do we create an S3 bucket?

Amazon Simple Storage Service (Amazon S3) is an object storage service offering industry-leading scalability, data availability, security, and performance. Customers of all sizes and industries can store and protect any amount of data for virtually any use case, such as data lakes, cloud-native applications, and mobile apps. With cost-effective storage classes and easy-to-use management features, you can optimize costs, organize data, and configure fine-tuned access controls to meet specific business, organizational, and compliance requirements.
That’s according to the AWS website.
Before we get started, some of you are already saying, screaming at the screen, “There’s already thousands of these posts out there.” Yes, there is, but, I’m going to cover the creation of the S3 bucket in multiple ways. I’ll also briefly talk about the small, insignificant topic of S3 bucket security.


Let’s not do THAT…
AWS Console
So first we’ll start with the AWS Console and we’re going to create an S3 bucket straight from S3. This would be the first way of actually creating a bucket.
- Open the AWS Console and click on S3
- Then click create bucket
- We’re going to just put in here a bucket name.
- Next we have the region. Well, I’m in Sydney, so I’m going to leave that as Sydney.
- We’ve got no settings to copy from another bucket so we leave that as is.
- And then we’ve got object ownership, “block public access” settings, bucket versioning, tags, default encryption, advanced settings, object lock…
What do these all mean?
I’m just going to go click create bucket because that’s what I’m going to do and I’ve got my bucket.
But there were a lot of things to consider and a lot of settings to confuse a new person who doesn’t understand the AWS ecosystem. So we’re going to look inside this bucket at what we’ve just done, and that is we’ve created an empty bucket.
Looking at the properties, bucket versioning not configured, there are no tags, there’s no encryption. Intelligent tiering is not enabled and there’s no server access logging.
If we look through our permissions, at least our buckets are not public, right? So that’s one good thing. That’s creating a bucket in the console.
So what are the defaults that have been applied there? Well, one of the main defaults that came across in the console was “block public access” was enabled by default, and that was created straight from the console. We’ve got a tick box which is checked by default to block all public access.
That’s quite new in terms of how old S3 is. It’s been around for probably about 4 years now, but back when S3 was first created, that was not a thing. And there were many security flaws out there and badly configured buckets that created many security breaches for a lot of customers.
AWS CloudFormation
We’re going to look now at other ways of creating a bucket.
We’ve just created a bucket in the console, and despite there being many settings to confuse people, we still got there. The next one that I’m going to do is CloudFormation. CloudFormation is a declarative language that allows you to create infrastructure, as code (IaC). We’re not going to go into what more this is, that’s not the scope of this.
We’re going to look at the source code, the language of CloudFormation, that creates our basic bucket.
(Resources for this post can be found at https://github.com/alanblockley/create-an-s3-bucket)
| |
We have two lines! Is it going to work?
Let’s find out.
Go back to our AWS console and open CloudFormation We’re going to go and create a new stack. Our template is ready so we’re going to upload it And then click next Now we are going to give it a name and then press next. Finally, we’re going to click create stack
That’s started making the resources (our bucket).
If we go into S3 now, what we can see is another bucket. But this time it’s got other characters in the name. This is how CloudFormation names your buckets. If you don’t give it a name, it will use your stack name, plus the resource type with a random sequence of digits.
So what are the defaults applied on our bucket right now?
If we look at the defaults of this bucket that’s just been created (by infrastructure as code) look at the properties, and again we have versioning in disabled, encryption disabled… nothing else is configured. We look at permissions and all of a sudden objects can be public, and “block public access” is disabled.
So that’s the difference right there. We don’t have this particular setting enabled by default, and that’s acceptable because at the end of the day, it’s a declarative language. It does exactly what it’s told and we didn’t tell it to do that. Whereas in the previous bucket it was told to do it by default. A programmer at AWS went and ticked that, on purpose, in the interface design.
Terraform
We’re going to move on and try another IaC language now and that is terraform, using the below;
(Resources are available in the github repo https://github.com/alanblockley/create-an-s3-bucket)
- Open a command prompt
- Browse to the terraform/createbucket
- Initialize the terraform project, “tf init”
- Run a terraform plan, “tf plan”
- Apply the terraform template to create your bucket, “tf apply”
This will complete very quickly. My bucket is there much quicker than the previously.
Let’s have a quick look at the code we just ran.
| |
We have a resource block with nothing more than the resource type. That’s it!
How did it create the bucket? What do the defaults look like? What’s the bucket name?
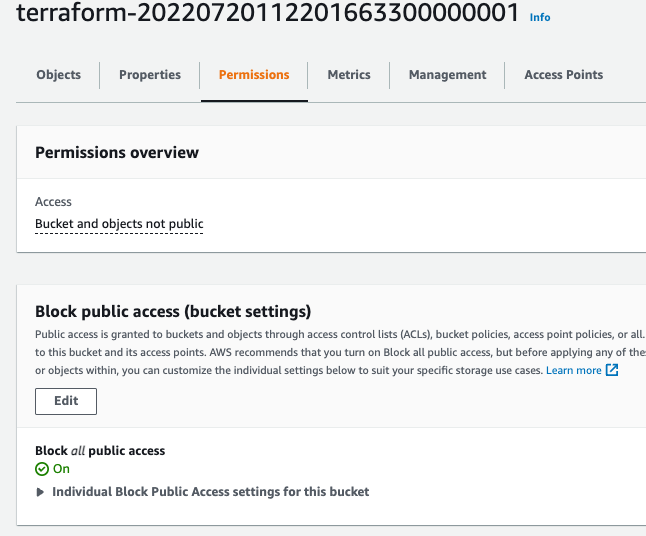
This time we’ve got a completely random bucket name, or what is perceived to be. It’s actually a time stamp, right? We look at the defaults of the bucket again, we can see there’s no versioning enabled, there’s no encryption and “block public access” isn’t actually enabled. So whilst it’s much easier and much cleaner to create the bucket through infrastructure as code, there are certain defaults that need enabling after the fact that to make it not public.
So what do we do from here? We want to secure our bucket. What we don’t want to do is cause a data breach. As I showed you earlier, best practices for securing an S3 bucket are ensuring that your bucket is not public. That’s becoming a thing. The next thing we’re going to focus on, is ensuring our buckets can’t be public. We’re going to go and make our buckets “not public” by using infrastructure as code.
AWS CloudFormation & Terraform - Not Public
Let’s look at CloudFormation and see what we can do to protect our buckets.
If we look at the template cloudformation/createsecurebucket.yml we now have some properties with a block of code to configure our public access configurations.
| |
I’m going to run this now to create a brand new bucket inside of AWS and show you the configuration there. I’m also going to then use it to update the existing bucket that we just created.
Creating new secure bucket
- Go back to CloudFormation
- Create a new stack again.
- Click on “Our template is ready” and upload it
- And then click next
- Give it a name and then press next.
- Finally, click create stack
You’ll notice under resources the new S3 bucket. If you click on the resource you’ll be taken to the S3 bucket. Looking at the permissions, we now have “block public access” switched on in our brand new bucket.
We can also use that same template to update our existing bucket we made earlier using either a change set or a stack update.
- Updating stacks directly - AWS CloudFormation - https://docs.aws.amazon.com/AWSCloudFormation/latest/UserGuide/using-cfn-updating-stacks-direct.html
- Updating stacks using change sets - AWS CloudFormation - https://docs.aws.amazon.com/AWSCloudFormation/latest/UserGuide/using-cfn-updating-stacks-changesets.html
Let’s try and do the same thing in terraform. If we look at our source code again, this time we’re going to look for the template that creates a secure bucket.
| |
You’ll notice that compared to the original template which just had the resource block, we now have to have a second resource block. That second resource block creates the “block public access” setting.
We’ll run this template, much the same as the previous.
- Open a command prompt
- Browse to the terraform/createsecurebucket
- Initialize the terraform project, “tf init”
- Run a terraform plan, “tf plan”
- Apply the terraform template to create your bucket, “tf apply”
That should create a brand new bucket with secure settings.

Summary
So that’s how you create an S3 bucket in three different ways;
In the AWS console Using CloudFormation Using terraform
One of the things that I just wanted to highlight today is the changing landscape of the cloud, specifically in S3.
But this applies to many of the services on AWS. Security is always going to be important and there is always going to be cyber attacks, new and old, being used against infrastructure that we launch in the cloud.
There’s always going to be new languages, new technology to make life easier. We started with just the AWS console, then CloudFormation was a thing and now terraform is a thing because it allows you to bring together many other cloud technologies.
I highly encourage anyone to look at all three of these methods and work out what suits them best.. But I can also say that it’s handy to have all three in your back pocket.
